Congratulations! You have a license! You are a nurse now, or have been a nurse for like, forever and yet inserting IV’s never seem to be your favorite thing to do at work. You have read the books, seen how it’s done, or you might have done it yourself, and it just seemed to be a burden still. You might hit a single shot of IV once in a while, but most of the time, it’s just not your day and have seen more bulges than backflows. Here’s a thing, YOU ARE NOT ALONE. Trust me, I might have been a nurse all my life, and starting IV’s have been my everyday thing, there are still days that seemed to be not a day for a series of single-shot and immediate backflows. It is perfectly normal.
But hey, great that you dropped by, you might just hit the jackpot today, because after reading these simple tips, you might just become a “nurse single hitter”-You know, the nurse that they actually call whenever they have this 2- year old overweight dehydrated toddler for IV insertion. It makes your morale boost right there, and trust me, it feels pretty good.
Let’s get started.
Here are the 15 steps to become an expert IV shooter.
1. Start with the easy ones and work your way up.
The best judge of your skill—is YOU. But that does not mean, every time there is an opportunity, you just have to hide behind all the notes that you have to finish in time. Target at least 3 IV insertion procedures a day, if you are newly assigned in the ward. Hit all the engorging veins in a single shot, and every time you got it once, tap yourself in the back. Practice makes perfect, the more insertions you get, the more self-esteem builds up, you will develop one of the most important skills, and that is CONFIDENCE.
2. There will always be someone better than you.
Never ever compare your skill with others, every single one of you has your own pace, it’s not a race for crying out loud. Instead, identify hitters in your team and learn from them, ask questions, keep an eye on their technique. You know the drill, follow what you can handle performing, and practice on easy veins first and work your way up on age ranges that need expert hits. Give it a year, and you’ll be hitting blind shots in no time.
3. Know your Veins.
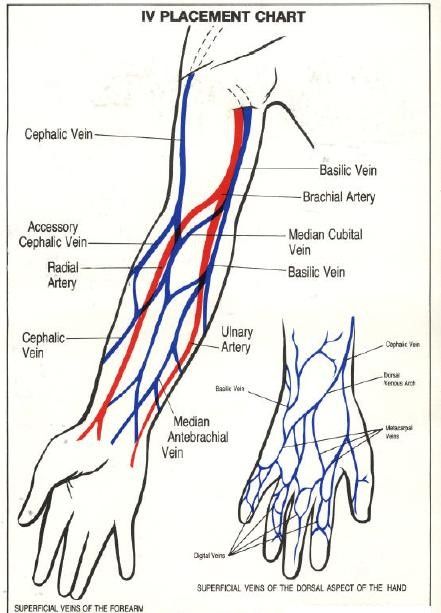
Knowing your anatomy is like being a computer programmer, not just a user. When something goes wrong you can troubleshoot your way out of the situation. You get things fixed. I always identify my favorite site based on age and patient size, including patient mobility and watcher toxicity—You know the drill. You don’t have to memorize vein name– you just have to be an expert in locating it. Develop your list and you will be an expert in no time.
4. Fake it till you make it.
Confidence does not only set your mood but also your patient’s—and the watchers. You might be not that good yet, but you will be, soon enough, so claim it every time you get inside the room. Trust when developed before the procedure will keep you confident and your patient calm, making it easier for you to navigate and assess the perfect site.
In case for kids, specifically crazy toddlers who has the strongest kicks and the loudest cry every time they see a white uniform with a needle, the key is to get strong people to restrain them. Developing trust with them might take time, and time is not on the table for dehydrated ones, or children with seizure disorders, an IV is much more important than cute talks. Find a strong (person to assist and restrain the child) assist to restrain the kid, more likely not the parents or the nosy nurse aunt. Keep them as far away as possible. If the parents keep the baby calm, talk to them first with a sense of urgency, which brings us to the next topic below.
5. Communicate
It’s easy to communicate with adults when doing any procedure, but when it comes to kids, toddlers and babies, it is pretty tricky. You don’t really have to convince the toddler to keep it calm, they will never be calm, prioritize the calmness of the watchers. I’ve always recommended doing the procedure with toddlers in the treatment room, away from parents nor watchers, but if you don’t have a treatment room, explain the urgency of an IV for the patient, never promise to hit a single shot, but always reassure them that you will do your best. This way, you don’t get to have an added pressure.
What if they ask for somebody else, and want an expert for their child? I always tell them that it’s hospital policy for the charge nurse to initiate the procedure and that is– you. You can only find an expert if you failed a single attempt.
6. As tight as it gets.
Book-wise, it’s not recommended, but experience-wise it is pretty effective. Just make sure that as soon as you hit the vein and backflow is visible, release the pressure immediately. This is not effective for the baby boomers though, patients aged 60s and above who have a very brittle veins. The veins are stressed and tend to blow when kept long.
7. Keep soft nice hands and feel the vein-like you mean it.
I’m more of a nurse who feels it more than just seeing it. Veins are spongy and rubbery, it can easily be identified against bones, cartilages, and muscles. I might see a good vein, but I can feel if it’s a single shot or might take several hits. Veins that you can palpate and feel are sturdier than those superficial veins that you see. They are most likely the single hit ones.
Make sure that your hands are taken care of. Hands that are soft and without callus feel more than neglected hands. Like a surgeon who stitches like art, your hands are your instrument, keep it clean and soft at all times.
8. Depth Matters more than sight
Never judge a vein based on what you see. Always remember that position and depth means much more than what is seen. Palpate and feel the depth of the vein, so you would know what angle is best. This takes us to the next topic.
9. Shallow to Deep

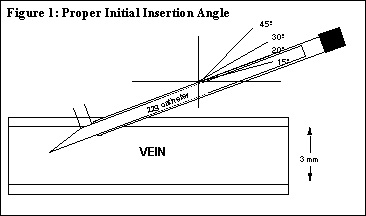
Never start with a higher angle, as much as possible stay within 30 to 45 degrees and work your way deeper as you push the needle forward. Keep an eye on the backflow, a backflow means consistent depth pushing forward as you get inside the vein. A backflow also means pulling the needle and pushing the cannula in, but still using the sturdiness of the needle as you push the cannula in. Some make a mistake in pulling the needle too early and too long. This may sound technical, but trust me this is perfected with consistent practice.
10. Taut and Anchor
Keeping the vein in place will also mean a lot, this will prevent needle thru and thru’s. Anchor the vein well with your non-dominant hand. This though is applicable only in adult veins. Which brings us to the next topic.
11. Double Tourniquet and Gravity
Video @intravenousqueen
You can never taut and anchor a baby vein or a thin brittle vein. The secret is double pressure tightening or the double tourniquet. From the chosen vein, apply the tourniquet half palm breath and the other tourniquet just half thumb breath above it. Place the arm lower than the heart so gravity helps, keep the arm below gravity for 15 to 20 seconds while inspecting and palpating the vein. Always remember to release the tourniquet within 2 minutes since you are occluding it with double pressure occlusion. Once a backflow is seen, release the distal tourniquet and when the cannula is in place, release the second one. This is a sure shot especially for babies with almost zero visibility veins.
12. Warm it up
Gently rubbing the patient’s hands, or just above the access site produces warmth, this will ensure more blood flow in the area, keeping veins taut and visible.
14. Know the valves
Video @Nursejanx
This is one of the mistakes that newbies even experts forget. Veins with valves. How do we know that there is a valve in the vein? Simple: Start threading a located vein or chosen access while occluding the distal end of the vein. Thread and release filling the vein again, if blood flows without stopping, while the distal end of the vein is occluded, that means there are no valves, if otherwise then that vein has a valve. Hitting a valve makes it harder for the cannula to go through the vein. No matter how big and visible the vein is, you will fail. So test the vein first with valves.
15. Get a quota.
I learned this from my mentor. Sometimes, we get challenged with patients who are hard to cannulate and we never stop from one vein to another. My mentor once told me to only cannulate twice, and if you are not successful, give it to other hands and apologize. When you give yourself a quota of only two tries, you will make sure that you do it right the first time. Never cannulate more than your quota, this will produce dissatisfaction to patients and worse frustration to yourself.
Keep your quota sacred, this will keep you grounded and make you more efficient until you become a single hit wonder.
What do you think about these tips? Does it help? Do you want to add more tips? Comment below and don’t forget to share this, so everyone wins.


![Caring for Patients with Tracheostomy and Nursing Diagnoses [ Updates] tracheostomynursingprocedure](https://rnspeak.com/wp-content/uploads/2020/10/tracheostomynursingprocedure_725820712-238x178.jpg)


Thank you so much for this, but I noticed something about people’s vein, though am a Rn but still a learner at setting the non prominent veins, good at the prominent ones. Later on I noticed, I couldn’t get familiar with it anymore thinking all veins can be straight. For cannulation, how can we identify a good vein on a patient with too much branching veins and what if it the identified vein is prominent but not straight, can it be used?